: Earthworms :
Friday, May 14, 2010
Posted by Jayme at 12:05 PM 0 comments
Labels: 12 years and up, 18 mo to 2 years, 3 to 5 years, 6 to 12 years, Earth Day, Felt, Garden, Inexpensive, Nature, Sewing, Spring, Summer, Wildlife
: Nature Wall Hanging Made with Cartons, Boxes, and Knick Knacks :
Sunday, May 2, 2010
We live tucked away on the edge of the forest up here in the mountains. Our family loves nature hikes, listening to the array of local birds, smelling the flowers.... So, I thought I would create a cute collection of naturey things we love for the boys to enjoy in their own space. My idea originally was inspired by Giddy Giddy, but as always, I decided to create something quite a bit different. :)
Posted by Jayme at 11:57 AM 4 comments
Labels: 12 years and up, Birds, Earth Day, Fabric, Flowers, Inexpensive, Nature, Parent Made, Recycle, Spring, Summer, We Just Like It
: Bookmarks = A Carton + Fabric :
Friday, April 30, 2010
There is a huge rave about the new Kindle, but I personally still prefer reading books. I like to hold the actual book itself and turn the pages and trace back by looking in the table of contents or the index..... I like books! But often times, I find myself refering to many books at one time and I can't always remember where I left off. So, I found this bookmark tutorial on Punkin Patterns, but I then decided to make it a little different, as I usually do.
Posted by Jayme at 1:04 PM 0 comments
Labels: 12 years and up, 6 to 12 years, Books, Earth Day, Fabric, Inexpensive, Parent Made, Recycle, Sewing
: Toilet Paper Roll Centerpiece :
Though Earth Day was last week, Earth day truly should be every day. Recycling and finding creative ways to reuse materials is always an eco-friendly choice. I actually got this toilet paper roll centerpiece idea a couple weeks ago and I cannot trace back to where it originated. I will keep searching. Either way, it was fun for my kids to make and they now have a decoration they can be proud of.
Posted by Jayme at 12:27 PM 0 comments
Labels: 12 years and up, 18 mo to 2 years, 3 to 5 years, 6 to 12 years, Earth Day, Inexpensive, Painting, Recycle
: More Flowers For Little Ones :
Wednesday, April 28, 2010
Flowers are things of Spring. They are things of beauty. They are things of life and of color. Flower are great for awakening your child's mind and imagination, both boys and girls. Here a couple simple, thrifty ways to make flower art with your toddlers and preschoolers.
Draw zigzags horizontally across the center of your construction paper. Have your young one cut along the lines. Mount your grass in a long row.
Tuck and bend your pipe cleaners where you want your flowers to be. Tape at the top of each (they will be covered by the flowers themselves).
To make your flowers, take a pretty long strand of streamer from your roll. Your kids will have fun crumpling these up and spinning a little, then gluing the loose parts. Also, make sure they make little centers for their flowers by pulling off 6-inch pieces and crumpling really tightly. Glue them on the flowers.
Allow to dry for several hours (we waited til the next day). Use double stick tape or fold tape onto itself so that it is sticky on both sides and mount each flower to its stem, making sure to cover the tape at the top of your pipe cleaners.
Additionally, you can create leaves with pipe cleaners, construction paper, etc...
There are so many ways to create springtime flower crafts for your little ones. Look around. See what you come up with and let your child's imagination bloom.

Posted by Jayme at 12:35 AM 2 comments
Labels: 12 years and up, 18 mo to 2 years, 3 to 5 years, 6 to 12 years, Earth Day, Easter, Flowers, Inexpensive, Spring, Summer
: Spring Flowers Garland :
Friday, April 23, 2010
Spring is a time of color, life, gardens, wildflowers.... Why not celebrate the very essense of the season with your little one. This project is a cheap way to entertain your kids and decorate your house for spring.
Pluck each flower and leaves from the bouquets.
Thread your needle with your yarn and get ready to start stringing.
Take the center out of each flower individually as you get ready to string them onto the yarn.
Push your needle through hole in the center and pull about 3 feet or more.
Do the same with the leaves, alternating between flowers.
Once you are done, cut the yarn to the desired length and tie both ends each in a loop so it can be easily hung.
Separate the flowers evenly how ever you like.
Hang it either verticly hanging or draped horizontally.
Posted by Jayme at 12:48 AM 1 comments
Labels: 12 years and up, 18 mo to 2 years, 3 to 5 years, 6 to 12 years, Earth Day, Easter, Flowers, Spring
: Cozy Cardboard Cottage :
Celebrate Earth Day by making a carboard box cottage with your child. I got this idea from Sweet Fancy who created a quaint gift box out of hers. We decided to make ours a bit different.
Have fun and get creative reusing a packaging box. By the way, you will need a little more cardboard to make the roof because the existing long flaps will not be long enough. You can paint it, use construction paper or use fabric as we did. We like the fabric because it creates a rich, lively feeling and it has a better quality when touched. By all means, add your own personal touches when decorating your house. Fun to make and satisfying to look at again and again.
Posted by Jayme at 12:02 AM 0 comments
Labels: 12 years and up, 18 mo to 2 years, 3 to 5 years, 6 to 12 years, Earth Day, Garden, Inexpensive, Recycle, Spring, Summer
: Egg Carton Counting :
Thursday, April 22, 2010
Earth Day is here! There are so many ways to take care of our environment, including the reuse of household recyclables. For instance, egg cartons have countless possibilities when it comes to transforming them into other things. We will continue to use egg cartons for crafts and activities. We have already created starters for seeds with cartons that were leftover from Easter. Today, Jared used an egg carton as a counting board with individual pouches for each number.
- Simply write numbers 1 through 12 on your paper (I used an index card because it is thicker), then cut them out to fit into each slot of the carton.
- Fill a small container with your lentils (use lima beans if lentils are too difficult).
- Demonstrate to your child how to pick up each lentil with the tweezers and set it in each slot. Also, explain to them that the object is to put as many lentils in each slot as the corresponding number calls for.
Posted by Jayme at 6:07 PM 0 comments
Labels: 3 to 5 years, 6 to 12 years, Earth Day, Inexpensive, Math, Montessori, Recycle
: Transforming Egg Cartons Into Seed Starters :
Monday, April 19, 2010
'Tis time to start gardening! There is nothing like the gratitude children get when they plant seeds and can watch them grow into plants that can further gratify by producing tasty, colorful food. This project from Growing Up Creative is great for Earth Day. It is biodegradable, it prevents the unnecessary purchase of supplies, and it is fun for the kids.
Posted by Jayme at 11:13 PM 0 comments
Labels: 12 years and up, 18 mo to 2 years, 3 to 5 years, 6 to 12 years, Botany, Earth Day, Garden, Inexpensive, Recycle, Spring, Summer
: Earthy Hand Print Wreath :
This wreath is a great way for your preschooler to throw a splash of color in honor of Earth Day. The tutorial on DLTK's Growing Together varies slightly from how my son and I decided to do it, partly because we were out of any more blue construction paper and we currently have no brown either.
Posted by Jayme at 10:13 PM 1 comments
Labels: 12 years and up, 18 mo to 2 years, 3 to 5 years, 6 to 12 years, Earth Day, Inexpensive, Spring
: Earth Hand Prints :
I thought of this project last night. So, this morning I pulled out the fingerpaints and doodled on my hand. My toddler awoke about 10 minutes later and we decided to test out this activity on his little hands.
Posted by Jayme at 11:06 AM 9 comments
Labels: 12 years and up, 18 mo to 2 years, 3 to 5 years, 6 to 12 years, Earth Day, Inexpensive, Painting, Spring
: Sewn Wool Felt Earth :
Earth Day is coming up in a few days...well, Earth Day is every day. So, we have decided to create a few crafts surrounding our planet, in addition to the recycle/reuse projects we have been doing. Here is one cute and thrifty project for your child to do.
Happy Earth Day to all. I hope you try and enjoy this project.
Posted by Jayme at 10:23 AM 0 comments
Labels: 12 years and up, 6 to 12 years, Earth Day, Inexpensive, Sewing, Spring
: Cactus Collection :
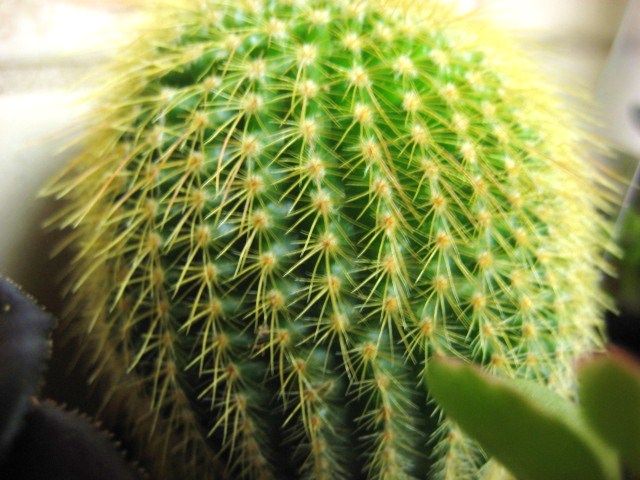
Last week, we took a trip to our local nursery. I looked around for standard houseplants, but everything was so much more expensive than I remember it being 2 years ago. So, as we were reluctantly browsing, we came across the Cacti family. I fell in love with the succulent selections available and the decent prices. My preschooler helped decide which varieties were the most attractive and lively. Each one is unique in its own way, which is extremely intriguing to each of my boys, and to me, for that matter.
Posted by Jayme at 9:48 AM 0 comments
Labels: 12 years and up, 18 mo to 2 years, 3 to 5 years, 6 to 12 years, Botany, Earth Day, Inexpensive, Recycle, Spring, Summer, We Just Like It


