Showing posts with label Fabric. Show all posts

: Lunch Bag and Accessories :

Thursday, August 19, 2010

The demands of going back to school can be fairly expensive. Between supplies, clothing, and any other necessary accessories, you are looking at spending a chunk of money. Many people have been hit by the recession, so spending heaps of money is not an option. Well, we like to get creative and use what we have. So, this year I decided Jared needed a new lunch bag for school (his old one was somehow left outdoors at night and got chewed up a little by a raccoon). I also decided to make him some reusable snack/sandwich bags to cut down on the waste.

I started the bag itself by measuring 5 rectangles: 6 1/2" x 14 1/2" for the back/flap, 5 1/2" x 6 1/2" for the bottom, 6 1/2" x 8 1/2" for the front of the bag, and 2 pieces of 5 1/2" x 8 1/2" for the sides of the bag. I did this twice on 2 different fabrics (one was an old corduroy shirt from my mother in law) so that it was nice inside and out. You could use the same fabric if you so choose.

I faced each matching size of fabric inwards towards itself (so you have wrong side facing out) and sewed a straight stitch along the outer edge, leaving an opening so that the fabric could be turned right side out. I then ironed the edges and set each aside until I was done with all 5 pieces. I then matched them up and sewed them altogether, as seen above.

Now, for accessories, I made these little bags like the old school disposable plastic sandwich/snack bags, with the fold over closure. I found the tutorial here. I recomend this for anyone. It is fast, easy, and very handy.

Aw, how quaint....

This bag is even cute on the inside and is easily washable.

This sandwich bag was created with the intention of using a velcro closure, but I had no velcro on hand and I then found the other snack bag tutorial. It works well to keep the sandwich fresh until lunch and it stays closed pretty well on it's own. The best feature is the liner in the bag... I made the fabric piece the same as the pieces on the bag itself, and then I lined it with a piece of cereal box bag cut to the same size. I used a straight stitch around the edges and the folded it to create a pocket which was sewn with a straight stitch along either side.

For the other snack bag shown in the center matches the sandwich bag in it's ultimate design. It is double sided fabric, lined with cereal bag material, but the catch is that it was sewn like the other sandwich bags. I want to certainly make more. The fabic snack bags are great for dry goods, but the lined ones are wonderful for sliced apples, cherries, grapes, slices vegetables, and so on. The fantastic thing about the lunch/snack bags is they can be thrown in the wash. The lined bags will simply have to be either quickly wiped with soapy water and dried. If the outer part of the bag starts to get icky, then hand wash and set out to dry. Other ideas may include pocket or slots within the bag or making matching cloth napkins.

I will be making another set this week. I hope you enjoyed this tutorial and making a personal lunch kit for your child.

~~~~~~~~~~~~~~~~~~~~~~~~~~~~~~~~~

: No-Sew Cloth Tissues :

Tuesday, May 4, 2010

I thought the season for runny noses and coughs was past us, but apparently I was wrong. I swear, there is always a little one at preschool that gets everyone else sick. It is viscious cycle of their little bodies toughening up and building a strong immune system, which is not always fun when they are going through it. Nor is it fun for mommies and daddies who are going through it with their children. The only thing we can do is be as nurturing as possible and try to meet their needs the best we possibly can. So, last night I was looking to make a hankie for Jared, but I came across this article, Make Your Own No-Sew Eco-Friendly T-Shirt Tissues by Fun in the Making, and decided this was exactly what we needed. I followed her tutorial and Jared awoke this morning sniffling and delighted that he had his very own Mommy-made collection of colorful, soft tissues. His eyes lit up when he got to blow his nose for the first time.


I have kept several clothes from my own wardrobe that I was going to get rid of at the time, but I realized I could eventually figure out some good uses for these reusable fabrics. I found a few shirts and a pair of old flannel pajama bottoms. I measured 7 inch squares and came out with about 30 tissues that can easily be washed and quickly line or machine dried. There is no sewing necessary. I stacked the tissues up and placed them next to a recycled container (for discarding the used tissues).


These are great in preventing red, raw skin around the nose. Our skin always prefers natural cloth to disposable products. Your kids will love these and they are a great way to make them feel special and look forward to blowing their little noses. So, instead of sending off all of your garments to the thrift store, think about making some reusable tissues with quickness and ease. Your kids will thank you.

: Nature Wall Hanging Made with Cartons, Boxes, and Knick Knacks :

Sunday, May 2, 2010

We live tucked away on the edge of the forest up here in the mountains. Our family loves nature hikes, listening to the array of local birds, smelling the flowers.... So, I thought I would create a cute collection of naturey things we love for the boys to enjoy in their own space. My idea originally was inspired by Giddy Giddy, but as always, I decided to create something quite a bit different. :)


I utilized milk cartons (1/2 gallon and quart sized), a tea box, granola bar boxes, tape, glue, scrap fabric, and various knick knacks mainly from the thrift store.


I cut each box and carton down to about 2 inches tall.


I laid out how I was going to put the wall hanging together.


I picked out different fabric for each little "cubby" and cut each to fit in its corresponding box by placing each box on top and marking the corners. Then, I cut right angles to each corner, as shown above.


I brushed each thoroughly with glue and placed each piece of fabric in its place. We let that dry overnight.


I used packaging tape to adhere all the boxes together. Then, I cut long strip of denim fabric, slightly thicker than the depth of the cubbies. I brushed the sides with glue and placed the fabric around the perimeter of the enitre decoration. I allowed that to dry before snipping the corners of the extra fabric and folding it over, gluing it to the inside edge of each nook. I also cut little denim strips to fit over the edges of the inside nooks. We let that dry. Note - if there are trouble spots that refuse to stay glued together while they are drying then use paper clips to clamp down the edges until they are dry. You could apply Mod Podge to seal everything when all is dry, but I skipped that step this project.


This froggie on toadstool figurine was found at the thrift store a day after I finished the boxes. I love the matching pink and green! And we love frogs and toadstools!


I grabbed this frame at the thrift store, as well. The picture was cut out of an old book. "The Littles" are shown dancing in a circle near the roots of a tree and a little stream. The kids like this image quite a bit.


We like owls in this house and I found this little handmade wall hanging at the thrift store, too. It appears to be from the 1970s... I love vintage.


When I was there, I also found this wood portrayal of bird, the bird figurine shown in the middle next to the egg, the 2 little boxes with the plants on the lids, and the wooden vase. At the dollar store, I found some little flowers to put in the vase. I added one of the boys' knitted gnomes and one of our plants. I hot glued everything on, except for the plant so it could be watered and moved when it gets too tall, their picture frame because it fit snugly in place, and their gnome, in case they want to play with it. Design your own structure, pick your own theme...this project is very flexible and very gratifying in the end. It will end up being a special collection that both you and your children will enjoy now and in the future!

: Milk Jug Flower Pot :

Saturday, May 1, 2010


There seems to be a theme here at Busy Hands..we keep making flower pots! 'Tis the season for flowers and pots and Moms...... We have also been on a reusing recycleables kick lately. We utilized half of a milk jug, scrap fabric, glue, a paint brush, a strip of felt, and some Mod Podge.


We cut pieces of fabric and brushed glue all over the sides of the jug. Then, my young one created a fabric collage.


He helped me put on the felt strip around the edges after we brushed the area generously with our glue. Then, we allowed everything to dry completely.


We brushed on a coat of Mod Podge to seal our pot decor and let that dry. He went to the garden and filled the pot with dirt and planted some lettuce seeds for me. Thanks, Jared. :)


Enjoy this project. It is a great way to reuse, create a colorful collage, and give a lovely gift to someone you really love. Happy Mother's Day!

: Bookmarks = A Carton + Fabric :

Friday, April 30, 2010

There is a huge rave about the new Kindle, but I personally still prefer reading books. I like to hold the actual book itself and turn the pages and trace back by looking in the table of contents or the index..... I like books! But often times, I find myself refering to many books at one time and I can't always remember where I left off. So, I found this bookmark tutorial on Punkin Patterns, but I then decided to make it a little different, as I usually do.


Essentially, I used a rice milk carton and scrap fabric to sew up these bookmarks. I was able yield 6 long rectangles from one small carton and I cut pieces of fabric just a bit bigger than the rectangles themselves. I pinned everything in place and sewed a zigzag stitch around the perimeter. I trimmed the excess fabric and that is it. Note - my sewing was horrible this time around. Again, I am an amatuer and apparently lack common sense :) . I couldn't figure out why the bookmarks weren't moving through the feed, so I figured I just suck at sewing and manually tried to pull it through. Only until I was all done and getting ready to do a straight stitch did I realize I needed to make sure the teeth were up, so as to pull your fabric through. I then remembered that around Christmas time I was attempting to sew buttons, which is why the teeth were down. I have one word for myself....Duh. Yet still, I think it is a project worth sharing.


These also make a great Mother's Day gift, so get started soon, or simply enjoy these functional beauties for your own reading delight.

: Scrap Fabric Dish Mat :

Thursday, April 29, 2010

This project wasn't made for or with the kids, but it is still very cute and simple, and I had to share. I love reusing old stuff to create new things. The other day, I found this kitchen towel mat tutorial on Toad's Treasures and decided to create one of my own.


Seeing that you can go to Toad's Treasures for the tutorial, I will skip the materials and directions this time around. I will just show you a photo progression of the project. Visuals always help me better than just wordy directions.


I hope you enjoyed this visual tutorial, in addition to the actual tutorial. Get sewing. Use your scrap fabric. Use an old dish towel. Get creative. Get Inspired.

: Cute Cloth Napkin Set :

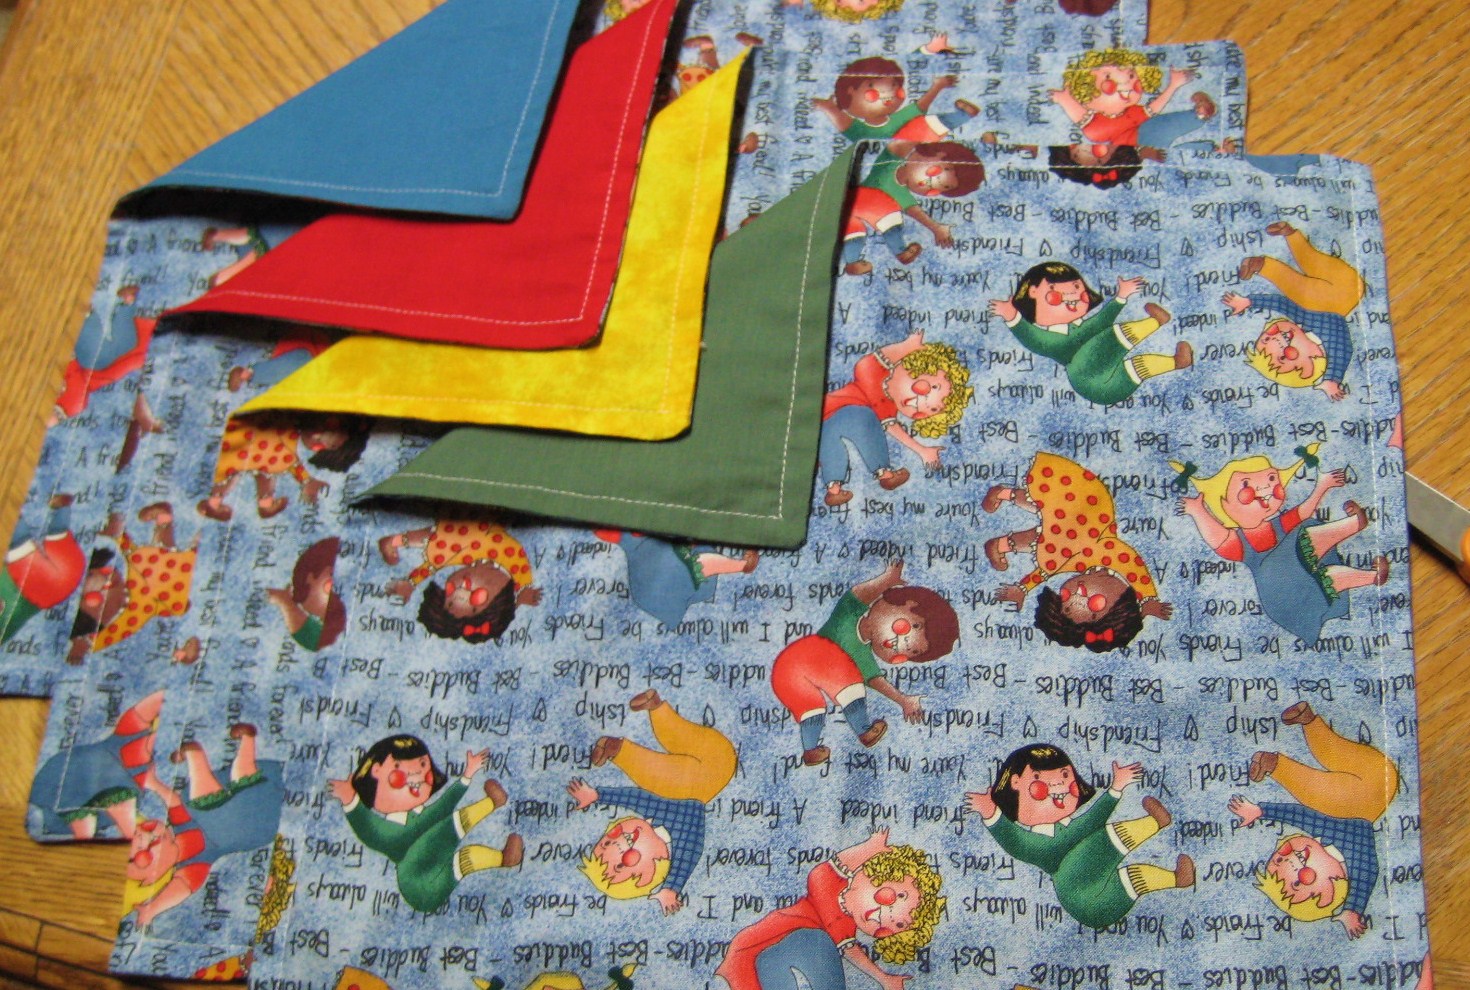
My preschooler attends a local Montessori school. His particular school requires that he brings a cloth napkin in his lunch every day. I bought him some white napkins originally, but I recently decided they are a little boring. So, I decided to make a few napkins that have some character.


Materials

4  13-inch squares of your pattern fabric
4  13-inch squares in various matching colored fabric
Sewing Machine
Pins
Scissors
Thread in color of your choice


Directions

  1. Pin your solid squares to your pattern squares, right side facing inward.

  2. Sew a straight stitch around the perimeter, leaving a small opening at one corner. Unpin.

  3. Flip inside out. Iron edges. Sew a seam around the perimeter, making sure to tuck in the seam where the opening was.


This project is fun and easy for any stitcher of any level, especially for amatuers like me! Enjoy fumbling through your fabric stash and creating some cute double-sided napkins for school/work lunches, picnics, or meals at home.

Related Posts with Thumbnails